

THE CHALLENGE: Finish a Kit
If you read the most recent “JOE’s CORNER’ post, then you already know what this is all about. If you haven’t, then the short version is: I am either going to finish a build — in a timely manner — or else!
STEP ONE: Picking a ‘Victim’
It’s been twenty years since I actually built and painted anything, so I want to keep this simple. I need a kit that I can build straight out of the box (i.e., SOB — hehehe, that was fun to say in my head). I want it to be a kit I can afford to lose or replace easily and affordably. Looking at the stash, I think I found the perfect ‘victim.’ I just happen to have two of these:

STEP TWO: Pick a Tentative Paint Scheme
Since I said I want to keep this simple (and I do), I think we’ll go with the second paint scheme, only, I’m going to add a little twist. I think we’ll make this good old ‘213.’ So, while I continue to move forward, I will look for and order the proper ‘panzer yellow’ and some decals. Really, I think I’ll just try to find the numbers as I might take a stab at painting the balkenruze. Anyway, check this step off the list.

STEP THREE: Start the Build
Now, no matter how hard I have tried in the past, I have never been able to build a kit according to the instructions. So, naturally, I’m not even going to try to do so here. Instead, I am going to assemble the hull, turret and running gear as much to completion as possible. Then I’ll paint them, paint the smaller details separately, and — finally — finish the final assembly for final weathering. At least, that’s the plan.
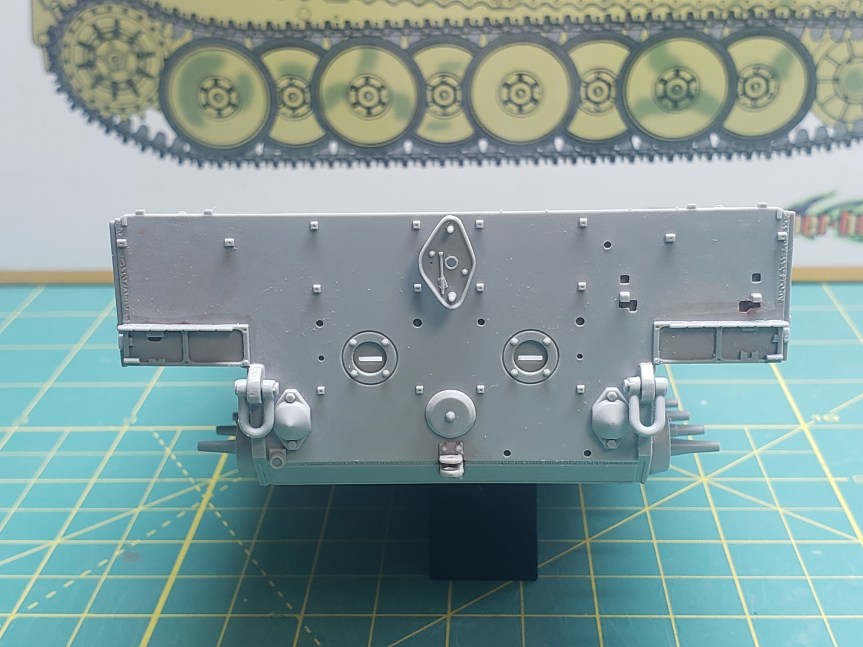
So, first things first, we start with the rear hull. I have to start by removing the late style hinge detail from the rear hull plate as shown below. For me, this is a piece of cake — mostly because it is close to what I do when I make patterns. Here’s where I’m at so far.


The part that wasn’t so easy was fixing the ‘step’ caused by the slide molds on the area of the final drive armor molded into the lower hull. It was too much to sand without creating an inward ‘slope’ effect, which would really look weird when finished. But, once again, a little car bondo and some careful shaping with a new #11 blade and medium grade sanding stick and this is what I have:


STEP FOUR: Finishing the Rear Hull
At this point, I need to build some sub-assemblies to be painted separately and attached later. Then I will add some texture to the items that were originally made from castings. Finally, I will glue everything to the rear hull that I intend to paint as one assembly. Pictures to follow.
STEP 5: Wrapping Up The Lower Hull
OK, I have textured the drive sprockets (eh) and exhaust armor (happy); filled sink marks and seams on the rear fenders and mufflers; and completed all other assemblies for the lower hull except for where I want to hold back for painting. Now, I have to paint the radiators and cooling fans and glue them in place before I can move on to the upper hull. So, here is what I’ve got for you to this point:


April 15
I took a short pause to wait on a new spray booth to be delivered. After reading a post on FB from another modeler about how he discovered he had been unknowingly breathing in acrylic residue from his Vallejo paints, I decided I needed to be safe rather than sorry — especially with my lungs. Anyway, this came in Monday, and was immediately set up and tested. Now, I just have to find a little time between family, TMD and not feeling too well (allergies are bad this spring), and I will paint the fuel tanks and radiators so I can button up the hull and keep marching.

OK, big jump, but, if nothing else, it should prove that I have been plugging away at this and have not given up on it.
Here is the base coat. I used A.MIG0010. It took a few tries, but, by the third coat, I was starting to get the hang of this paint line — once I had the thinner and air pressure ratios worked out, that is. Still, it goes on a lot ‘wetter’ than I’d prefer, and dries with a slightly glossy sheen. I do not like that last part at all, but I suppose that is what mat varnishes are for — IF they will dry mat, that is.


And here, I have started to paint the engine compartment and fuel tank-radiator-cooling fan assembly in Vallejo red primer. I like this a lot better. Goes on a bit dryer and dries with a nice, mat appearance. Very happy with Vallejo so far.

I have moved on already, and am trying my hand at ‘weathering’ the engine compartment. I’ll post pics later but, so far, I am not happy, not happy at all! If I had the money, I’d start my own line of enamel paints and return to something as familiar as the Model Master line. If things do not get better, I can see my shipping bill with Hannets going W-A-Y up as I acquire as many Humbrol paints as I can possibly afford.